
Bread Stuffing Balls 1940s Recipe Guide
The History and Heritage of 1940s Bread Stuffing
Why Bread Stuffing Balls Became a Staple in the 1940s
The 1940s were a time when families had to get creative in the kitchen. With World War II in full swing, rationing limited access to many ingredients. That’s where the humble bread stuffing balls came into play. They were filling, budget-friendly, and made the most of what was already in the pantry. Not to mention, they brought a touch of comfort to dinner tables across America during uncertain times.
How Wartime Rationing Gave Birth to This Classic Dish
Meat was scarce, butter was precious, and waste was frowned upon. So families reused stale bread and scraps of vegetables to make stuffing — then turned it into neat little balls that were easy to cook and portion. The recipe became a symbol of resilience and resourcefulness — and it still tastes amazing.
Key Ingredients for Traditional Stuffing Balls
What Made 1940s Stuffing Balls So Memorable
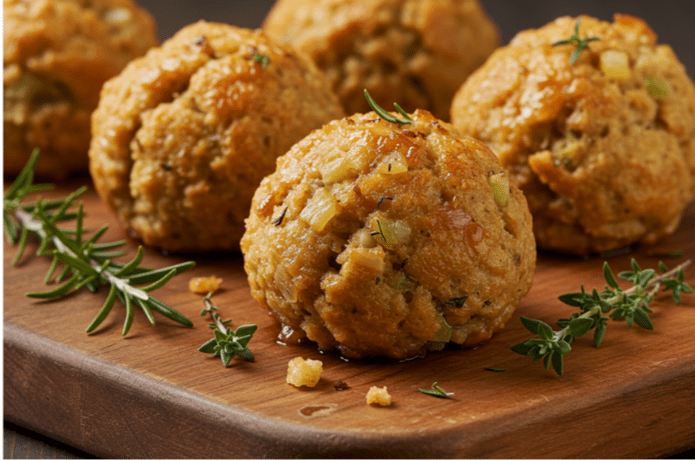
These balls weren’t just practical — they were delicious. The base was cubed stale bread, but it was the magic mix of onions, celery, broth, and herbs that gave it that unforgettable aroma and taste. It was like wrapping nostalgia and warmth into a perfect bite.
The Flavor Makers: Herbs That Made a Difference
The classic herb trio? Sage, thyme, and parsley. Sage brought the earthy richness, thyme added depth, and parsley gave it a bright note. These herbs transformed basic bread into a savory delight. A pinch of poultry seasoning was also common in some regions.
Choosing the Right Bread for Stuffing
Turning Leftover Loaves into 1940s Kitchen Gold
Nothing went to waste in a 1940s kitchen. Day-old loaves, ends of sandwich bread, and even stale rolls were chopped up and dried out for stuffing. That dry texture was essential for soaking up broth and flavor.
Modern Bread Choices That Honor the Original
If you’re trying this today, go for white sandwich bread, sourdough, or even whole wheat for a modern twist. Just remember to dry it out first — fresh bread turns soggy fast.
Classic 1940s Bread Stuffing Balls Recipe
How to Make Bread Stuffing Balls 1940s Recipe the Way It Was Meant to Be
Let’s bring history back to life — bite by bite.
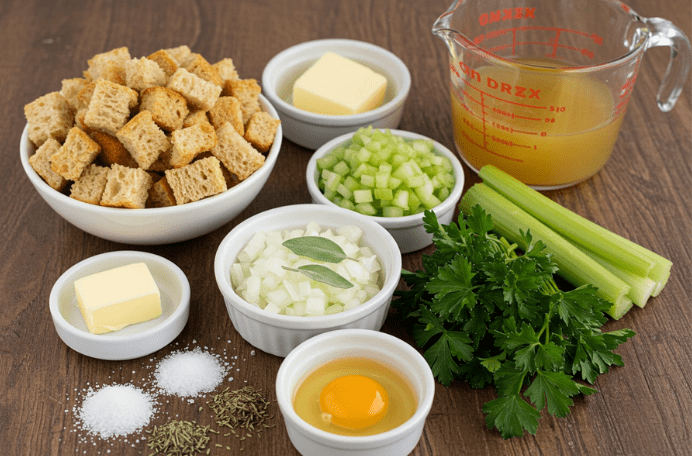
What You’ll Need for Authentic 1940s Stuffing Balls
8 cups cubed, dried bread
1 medium onion, finely chopped
2–3 stalks celery, chopped
1/4 cup chopped fresh parsley
1 tsp dried sage
1/2 tsp dried thyme
Salt & pepper to taste
1/2 cup butter (or margarine, as used back then)
1–1.5 cups chicken or vegetable broth
1 egg (optional for binding)
How to Make Bread Stuffing Balls 1940s Recipe — Step by Step
Step 1: Dry the Bread
Cut your bread into ½-inch cubes and spread them on a baking sheet. Let them sit overnight or toast them lightly in the oven at 275°F for about 15–20 minutes until crispy but not browned.
Step 2: Cook the Vegetables
Warm the butter in a pan over medium heat until it’s fully melted.. Sauté onions and celery until soft and fragrant — about 5 minutes. Stir in the herbs and remove from heat.
Step 3: Combine and Season
Place the dried bread cubes in a large bowl. Pour the sautéed vegetable mixture over the bread. Add chopped parsley, salt, pepper, and enough broth to moisten the mixture without making it soggy. Mix in the egg if you want extra binding.
Step 4: Shape into Balls
Using your hands or an ice cream scoop, shape the mixture into balls, about the size of a golf ball.
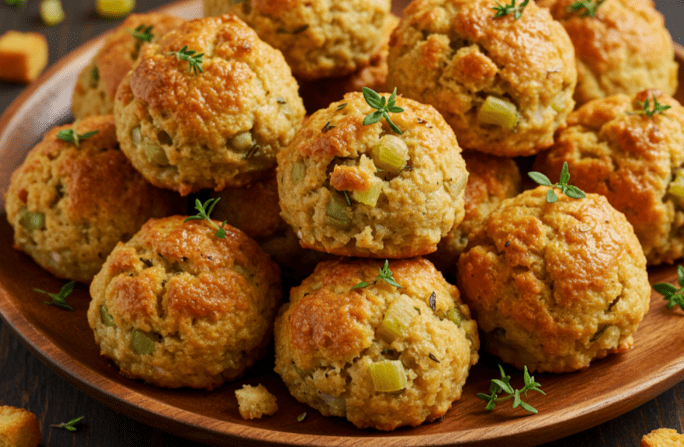
Step 5: Bake Until Golden
Place the balls on a greased baking sheet. Bake at 350°F for 20–25 minutes until golden brown and crispy on the outside.
Cooking Methods from the 1940s
Traditional Cooking Methods for Stuffing Balls in the 1940s
Many households baked stuffing balls in wood-fired or gas ovens. But others pan-fried them in cast iron skillets for that crispy crust.
Baking vs. Pan-Frying: What Was Common Then
Baking was more convenient, but pan-frying offered crispier edges. Some cooks even did a bit of both: baked first, then pan-seared before serving.
Vintage Cookware Still Holds Up Today
You can still use grandma’s cast iron skillet or enameled bakeware to get that authentic retro feel.
They hold heat beautifully and bring out deeper flavors.
Essential Tips for Perfecting the Classic 1940s Stuffing Balls Recipe
Don’t over-wet the bread
Use fresh herbs if possible
Add broth slowly and taste as you go
Pack the balls just firmly enough to hold together
How to Make Stuffing Balls in Advance
Prep Like a Pro: How to Make Bread Stuffing Balls 1940s Recipe Ahead of Time
Stuffing balls are the original make-ahead side dish.
Step 1: Mix the Night Before
Make the mixture and store it in the fridge overnight.
Step 2: Shape Early, Bake Later
Shape the balls in the morning and refrigerate them on a baking sheet until ready to bake.
Step 3: Freeze for Long-Term Prep
You can freeze unbaked stuffing balls. Just flash freeze on a tray, then store in a freezer bag. Bake from frozen at 375°F for 30 minutes.
Step 4: Reheat Without Drying Them Out
Reheat baked balls in a covered dish with a splash of broth to keep them moist.
Step 5: Advance Prep Is Tradition in Disguise
During the 1940s, women prepped meals in steps all week long. Planning ahead is staying true to tradition.
Serving and Pairing Suggestions
Serving Stuffing Balls with a Touch of 1940s Nostalgia
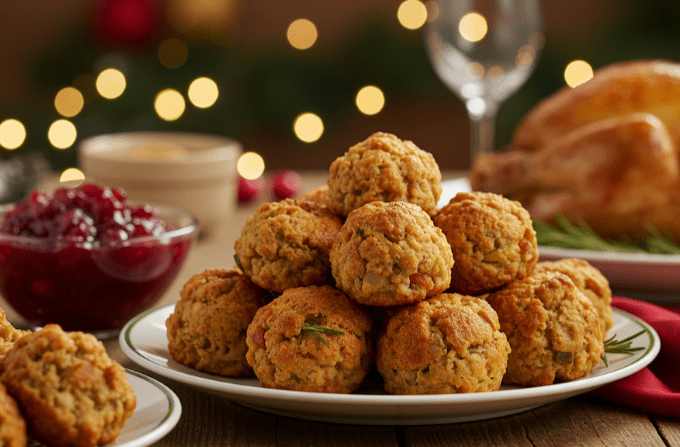
Serve them family-style in a big bowl or neatly stacked on a platter. Garnish with a sprig of parsley for that old-school charm.
Perfect Pairings for Bread Stuffing Balls
These balls go perfectly with roasted chicken, turkey, or ham. They also shine alongside mashed potatoes, gravy, and green beans.
Holiday Serving Ideas
Use them in place of traditional stuffing at Thanksgiving. They’re easier to portion and reheat — and no soggy turkey cavities involved.
Everyday Meals Made Special
Pair them with soup or a salad for a cozy weeknight meal. They make leftovers exciting again.
Why These Pairings Still Work
Classic comfort never goes out of style. These stuffing balls are a throwback that still holds their own at the dinner table.
Variations Inspired by 1940s Stuffing
Putting Your Spin on a 1940s Classic: Creative Takes on Bread Stuffing Balls
Modern upgrades? Toss in some crispy bacon, earthy mushrooms, or tangy dried cranberries.
Southern Comfort with Cornbread and Heat
Swap half the bread for cornbread and add diced jalapeños for Southern spice.
Northeastern Flavors with Fruit and Seafood
Add chopped apples and oysters — yes, oysters — a colonial tradition still alive in parts of New England.
Midwest Resourcefulness in Every Bite
Ground sausage, cheddar, and chopped pickles bring hearty Midwest flair.
Meat-Free and Still Full of Flavor
Use veggie broth and load up on mushrooms and nuts for a rich, vegetarian version.
Gluten-Free Versions with All the Nostalgia
Go gluten-free by swapping in GF bread and checking that your broth and spices are safe..
Adding International Flair to a Classic
Try Italian seasoning and Parmesan, or go Greek with olives and feta. A world of flavors wrapped in one little ball.
Why These Variations Matter
Food evolves with us. Still, the heart of the dish—comfort, creativity, and taste—remains unchanged.
Nutritional Value & Modern Adjustments
Blending Old-School Flavor with Modern Wellness in This 1940s Stuffing Ball Recipe
Even comfort food can get a healthy upgrade.
A Look at the Basics: What’s in It?
Calories: ~100–150 per ball
Protein: ~3g
Fat: ~5g
Carbs: ~15g
Lower-Sodium Adjustments
Use low-sodium broth and unsalted butter. You can always add salt later.
Boosting Fiber and Nutrients
Mix in chopped carrots, spinach, or mushrooms. Use whole grain bread for more fiber.
Lighter Fats, Same Comfort
Swap half the butter with olive oil, or skip the butter entirely if sautéing in broth.
Making It Fit Special Diets
Dairy-free? Use oil. Vegan? Skip the egg and use veggie broth. Keto? Use almond flour bread.
Portion Control Without Losing Tradition
Stick to golf ball-size portions. They’re easy to count, freeze, and share.
A Recipe That Adapts with You
This isn’t just a dish — it’s a canvas for your creativity, rooted in a history of making do and making it delicious.
A Bite of Nostalgia: My Journey Back to the Flavors of the 1940s
One bite and I was in grandma’s kitchen — a simple smell, a warm crunch, and a flavor that brings the past right back to your plate.
Frequently Asked Questions (FAQ)
What spices are good in bread stuffing?
Classic spices include sage, thyme, and parsley. Poultry seasoning and a bit of nutmeg or marjoram can add a cozy touch.
Should you use old bread for stuffing?
Yes! Day-old or dried bread soaks up broth and holds shape better than fresh bread.
What is traditional stuffing made of?
Bread, onion, celery, herbs, butter, and broth. Some variations add eggs, meat, or fruits.
When’s the Best Time to Prep Stuffing Balls Ahead of Time?
Mix everything 1–2 days early, shape the night before, and pop them in the oven just before serving.
Can you freeze bread stuffing balls?
Absolutely. Freeze them unbaked for best texture. Bake from frozen and enjoy any time.
Recipe Card
How To Make Best Bread Stuffing Balls 1940s Recipe
Ingredients
- 6 cups day-old bread cubed or torn
- ½ cup unsalted butter
- 1 cup onion finely chopped
- 1 cup celery finely chopped
- ¼ cup fresh parsley chopped
- 1 tsp salt
- ½ tsp black pepper
- ½ tsp dried sage
- ½ tsp dried thyme
- ¼ tsp nutmeg optional
- ½ to ¾ cup chicken broth or vegetable broth
Instructions
- Dry the Bread: Let the bread sit out overnight, or toast in the oven at 300°F (150°C) for 10–15 minutes until dry but not browned.
- Cook the Veggies: In a skillet, melt the butter over medium heat. Sauté onion and celery until soft and translucent (about 8–10 minutes).
- Combine & Season: In a large bowl, combine the dried bread, cooked vegetables, parsley, and all seasonings. Slowly add broth while mixing, just enough to moisten but not soak
- Shape into Balls: With your hands, form mixture into balls about the size of golf balls. Press gently to hold their shape.
- Bake: Place stuffing balls on a greased baking sheet. Bake at 350°F (175°C) for 25–30 minutes or until golden and crisp on the outside.
Notes
Add cooked bacon, mushrooms, or cranberries for a modern twist. Use gluten-free bread and broth for a gluten-free version. Freeze before baking to prep ahead for holidays. 🍽️ Serving Suggestion:
Serve alongside roast chicken, turkey, or as a comforting vegetarian side with gravy.